关于发布版软件无法加载ReportViewer问题

场景:做RDLC报表开发,开发机可以使用,用户机子上却无法打开

原因:由于做开发的,个人机子上环境比较完整,在做RDLC报表开发时,visual studio 在处理部分dll时,并未将dll复制到本地,即客户机缺少dll,故我们需要手动将其改为复制到本地。

解决方案:

状况1、ReportViewer控件直接无法创建初始化,缺少Microsoft.ReportViewer.Common程序集dll,一般情况,在处理rdlc时,此程序集已经自动引用,只需修改属性“复制到本地”为true;若没有找到,可自行引用,路径如下:

C:\Windows\assembly\GAC_MSIL\Microsoft.ReportViewer.Common\12.0.0.0__89845dcd8080cc91\Microsoft.ReportViewer.Common.dll

其中12.0.0.0__89845dcd8080cc91为版本,尽量和Microsoft.ReportViewer.WinForms版本保持一致。


状况2、ReportViewer能够加载,内部rdlc加载错误,提示缺少Microsoft.ReportViewer.ProcessingObjectModel的引用,处理方法同上,dll路径如下:

C:\Windows\assembly\GAC_MSIL\Microsoft.ReportViewer.ProcessingObjectModel\12.0.0.0__89845dcd8080cc91\Microsoft.ReportViewer.ProcessingObjectModel.DLL

EF中无法使用时间转字符串

旧地址:https://www.shisujie.com/efdatetostringerror

场景:

查询条件需要使用到时间类型,且需要特殊格式化,例:ToString("yyyy-MM-dd");即,在需要使用时间进行like方式处理时;

此时,用如下方式:

var q = from c in context.HasDateModels where c.UserDate.ToString("yyyy-MM-dd").Contains("20") select c; 

进行查询使用;

提示:LINQ to Entities 不识别方法"System.String ToString(System.String)",因此该方法无法转换为存储表达式

即:Linq to Entities不支持带参数的时间字符串转换


解决方法:

以下方法只适用于数据量较小的情况,同时建议,使用此法,若有其他条件,建议先进行一次Linq to Entities筛选后再处理以下情况;

var q = from c in context.HasDateModels.AsEnumerable() where c.UserDate.ToString("yyyy-MM-dd").Contains("20") select c; 

原理:利用AsEnumerable将使用方式转化为Linq to Object,即将数据查询至内存后再进行筛选 

Spring.NET入门(Step1)——基本配置及对象创建

旧地址:http://blog.canself.com/springnet_creatobject/

关于Spring.net及IoC、DI等的介绍,此处就不详述——偶不擅长啦。下面直入主题:首先说说基础配置。

首先是添加引用了,现在微软的nuget操作起来很方便了,直接在nuget找到Spring.Core的项,安装即可,至于其他的Spring.NET相关的dll可以需要时添加使用,如用AOP时,添加Spring.AOP。

下面就是创建对象了:

首先,可以使用最简单的例子,将所有配置都放在app.config中,类及配置文件见下方代码:

1
2
3
4
5
6
7
8
9
10
11
12
13
14
/// <summary>
/// 利用App.config配置创建对象
/// </summary>
public class AppConfigObject
{
public AppConfigObject()
{
}

public void Run()
{
Console.WriteLine("AppConfigObject运行!");
}
}
1
2
3
4
5
6
7
8
9
10
11
12
13
14
15
16
17
18
19
20
21
<!--app.config配置文件-->
<?xml version="1.0" encoding="utf-8" ?>
<configuration>
<configSections>
<sectionGroup name="spring">
<section name="context" type="Spring.Context.Support.ContextHandler, Spring.Core" />
<section name="objects" type="Spring.Context.Support.DefaultSectionHandler, Spring.Core" />
</sectionGroup>
</configSections>

<spring>
<context>
<resource uri="config://spring/objects" />
</context>

<objects xmlns="http://www.springframework.net">
<object id="AppConfigObject" type="SpringNETCreateObject.AppConfigObject, SpringNETCreateObject" />
</objects>

</spring>
</configuration>

使用时如下即可:

1
2
3
IApplicationContext ctx = ContextRegistry.GetContext();
AppConfigObject dao = ctx.GetObject("AppConfigObject") as AppConfigObject;
dao.Run();

但是,软件开发中,为了方便管理,往往添加单独的xml配置。

如:添加单独的Objects.xml

1
2
3
4
5
6
7
8
9
<?xml version="1.0" encoding="utf-8" ?>
<objects xmlns="http://www.springframework.net"
xmlns:xsi="http://www.w3.org/2001/XMLSchema-instance"
xsi:schemaLocation="http://www.springframework.net
http://www.springframework.net/xsd/spring-objects.xsd">

<object id="XMLObject" type="SpringNETCreateObject.XMLObject, SpringNETCreateObject">
</object>
</objects>

然后再app.config的spring/context下添加

1
2
<!--文件复制到输出目录、生成操作为内容时使用file://-->
<resource uri="file://Objects.xml"/>

或者直接在代码里使用xml

1
2
3
IApplicationContext ctx1 = new XmlApplicationContext(
"file://Objects.xml"
);

对象的创建则使用ApplicationContext对象。

最后,讲一些特殊类型的对象创建配置。其中包括嵌入类型、泛型类型。

其中需要在app.config的spring/context下添加

1
2
3
<!--添加resource时,可以自行选择assembly或file,上面用过file了,这里用一下assembly-->
<!--使用assembly时,需要将生成操作修改为嵌入的资源-->
<resource uri="assembly://DAO/DAO/DAOObjects.xml"/>

objects配置文件:

1
2
3
4
5
6
7
8
9
10
11
12
<?xml version="1.0" encoding="utf-8" ?>
<objects xmlns="http://www.springframework.net"
xmlns:xsi="http://www.w3.org/2001/XMLSchema-instance"
xsi:schemaLocation="http://www.springframework.net
http://www.springframework.net/xsd/spring-objects.xsd">

<object id="normaldao" type="DAO.NormalDAO,DAO"/>
<!--嵌套类型需要使用‘+’连接-->
<object id="nesteddao" type="DAO.NestedDAO+InnerDAO,DAO" />
<!--泛型类型中的小于号需以‘&lt;’替代-->
<object id="genericdao" type="DAO.GenericDAO&lt;int>,DAO" />
</objects>

相关类:

1
2
3
4
5
6
7
8
9
10
11
12
13
14
15
16
17
18
19
20
21
22
23
24
25
26
27
28
29
30
31
32
33
34
35
36
37
38
39
40
41
42
43
44
/// <summary>
/// 基类
/// </summary>
public interface BaseDAO
{
void Run();
}

/// <summary>
/// 普通类型
/// </summary>
public class NormalDAO : BaseDAO
{
public void Run()
{
Console.WriteLine("NormalDAO运行");
}
}

/// <summary>
/// 嵌套类型
/// </summary>
public class NestedDAO
{
public class InnerDAO : BaseDAO
{
public void Run()
{
Console.WriteLine("NestedDAO运行");
}
}
}

/// <summary>
/// 泛型类型
/// </summary>
/// <typeparam name="T"></typeparam>
public class GenericDAO<T> : BaseDAO
{
public void Run()
{
Console.WriteLine("泛型({0})运行", this.GetType());
}
}

使用:

1
2
3
4
5
6
7
8
BaseDAO normaldao = ctx.GetObject("normaldao") as BaseDAO;
normaldao.Run();

BaseDAO nesteddao = ctx.GetObject("nesteddao") as BaseDAO;
nesteddao.Run();

BaseDAO genericdao = ctx.GetObject("genericdao") as BaseDAO;
genericdao.Run();

项目地址:https://springnetstudy.codeplex.com

Spring.NET学习资料汇总

旧地址:http://blog.canself.com/spingnet_summary/

相关学习地址:

1、Spring.NET学习笔记——刘冬的博客-Spring.NET分类【强烈推荐,尽管很早之前写的,但真的不错】

2、循序渐进之Spring.Net框架——未细看,不过也是一个系列吧。

3、Spring.NET+NHibernate教程——雨枫技术教程网,页面广告多,内容没细看,不过有完整的流程

4、控制反转,依赖注入介绍——英文,有兴趣看看吧

咱就入个门之NHibernate映射文件配置(二)

旧地址:http://blog.canself.com/nhibernate_onetomany/

上一篇主要介绍了NHibernate映射文件的基础配置,这篇我们介绍下NHibernate的一对多及多对一配置(文中我直接使用双向关联,即一和多两端都配置,开发中可以只使用一端),同时略带介绍下NHibernate.Mapping.Attributes方式配置表映射。

首先,我们使用Parent和Children两个类,Parent为一端,Chrildren为多端。

下面是Parent类和映射文件配置:

1
2
3
4
5
6
7
8
9
10
11
namespace NHibernateStudy.OneToMany
{
public class Parent
{
public virtual String Id { get; set; }

public virtual String Name { get; set; }

public virtual IList<Children> Children { get; set; }
}
}
1
2
3
4
5
6
7
8
9
10
11
12
13
<?xml version="1.0" encoding="utf-8" ?>
<hibernate-mapping xmlns="urn:nhibernate-mapping-2.2" assembly="NHibernateStudy" namespace="NHibernateStudy.OneToMany">
<class name="Parent" table="parents">
<id name="Id" column="id" type="String">
<generator class="uuid.hex" />
</id>
<property name="Name" column="name" type="String" />
<bag name="Children" table="children" inverse="true" cascade="all">
<key column="parentid" />
<one-to-many class="NHibernateStudy.OneToMany.Children"/>
</bag>
</class>
</hibernate-mapping>

其中cascade我配置了all,保证级联更新,若有其他需求可以使用none等值。

下面是Children类及配置文件:

1
2
3
4
5
6
7
8
9
10
11
namespace NHibernateStudy.OneToMany
{
public class Children
{
public virtual string Id { get; set; }

public virtual string Name { get; set; }

public virtual Parent TheParent { get; set; }
}
}

其中需要注意,many-to-one中,column写的是当前表的字段——外键;而配置一端时,其中key里的column配置的是多端的字段,即子表里的外键,而非当期表字段。

配置文件中添加mapping:

1
2
<mapping resource="NHibernateStudy.OneToMany.Parent.hbm.xml" assembly="NHibernateStudy" />
<mapping resource="NHibernateStudy.OneToMany.Children.hbm.xml" assembly="NHibernateStudy" />

下面是使用方式过程:

1
2
3
4
5
6
7
8
9
10
11
12
13
14
15
16
17
18
19
20
21
#region 添加一对多关联数据
Parent parent = new Parent();
parent.Name = "parent" + DateTime.Now.ToString("MMddHHmmss");
parent.Children = new List<Children>();
Children child = new Children();
child.Name = "child" + DateTime.Now.ToString("MMddHHmmss");
child.TheParent = parent;
parent.Children.Clear();
parent.Children.Add(child);
session.Save(parent);
session.BeginTransaction().Commit();
#endregion

#region 查看多对一数据
IList<Children> children = session.CreateCriteria<Children>().List<Children>();
foreach (var item in children)
{
Parent itemparent = item.TheParent ?? new Parent();
Console.WriteLine(string.Format("ChildId:{0} Name:{1} \r\nParentId:{2} ParentName:{3}", item.Id, item.Name, itemparent.Id, itemparent.Name));
}
#endregion

下面介绍下Attributes方式配置映射文件。
首先添加NHibernate.Mapping.Attributes引用,可以在nuget中查找。

下面是配置的类,使用此法可以避免使用hbm.xml的繁琐,其中的属性与hbm.xml中的基本一致。

1
2
3
4
5
6
7
8
9
10
11
12
13
14
15
16
17
18
19
namespace NHibernateStudy
{
[Serializable]
[Class(Table = "animals", Name = "NHibernateStudy.Animal,NHibernateStudy")]
public class Animal
{
/// <summary>
/// 主键
/// </summary>
[Id(Name = "Id", Column = "id", TypeType = typeof(string))]
[Key]
[Generator(Class = "uuid.hex")]
public virtual String Id { get; set; }

[Property(Name = "Name", Column = "name")]
public virtual string Name { get; set; }

}
}

不过需要注意的是,在代码中使用的时候,需要使用以下方式加载Mapping。

1
2
3
4
5
6
7
8
9
10
11
12
13
Configuration cfg = new Configuration();

MemoryStream stream = new MemoryStream();
NHibernate.Mapping.Attributes.HbmSerializer.Default.Validate = true;
NHibernate.Mapping.Attributes.HbmSerializer.Default.Serialize(
stream, System.Reflection.Assembly.GetExecutingAssembly());
stream.Position = 0; // Rewind
cfg.Configure();
cfg.AddInputStream(stream); // Use the stream here
stream.Close();

ISessionFactory sessionFactory =cfg.BuildSessionFactory();
ISession session = sessionFactory.OpenSession();

下面是具体使用过程:

1
2
3
4
5
6
7
8
9
10
11
12
#region NHibernate.Mapping.Attributes映射添加一条数据
Animal a = new Animal();
a.Name = "animal" + DateTime.Now.ToString("MMddHHmmss");
session.Save(a);
session.BeginTransaction().Commit();

IList<Animal> an = session.CreateCriteria<Animal>().List<Animal>();
foreach (var item in an)
{
Console.WriteLine("Animal——ID: " + item.Id + " Name:" + item.Name);
}
#endregion

咱就入个门之NHibernate映射文件配置(一)

旧地址:http://blog.canself.com/nhibernate_hbm_xml/

之前写了数据库连接配置,这次说说映射文件的配置,即表映射【ORM的核心就是此啦!】。

下面我们使用最原始的手动配置hbm.xml文件。

步骤:

1、添加People类

1
2
3
4
5
6
7
8
9
10
11
12
13
14
15
16
17
18
19
20
21
22
23
24
25
26
27
28
29
30
namespace NHibernateStudy
{
public class People
{
/// <summary>
/// 主键
/// </summary>
public virtual String Id { get; set; }

/// <summary>
/// 姓名
/// </summary>
public virtual string Name { get; set; }

/// <summary>
/// 性别
/// </summary>
public virtual bool Sex { get; set; }

/// <summary>
/// 年龄
/// </summary>
public virtual Int32 Age { get; set; }

public virtual string FirstName { get; set; }
public virtual string LastName { get; set; }
public virtual string FullName { get; set; }
public virtual string TempFullName { get; set; }
}
}

2、添加People.hbm.xml文件【注意哦:生成操作要改为“嵌入的资源”——右击文件,选择属性】

1
2
3
4
5
6
7
8
9
10
11
12
13
14
15
16
<?xml version="1.0" encoding="utf-8" ?>
<hibernate-mapping xmlns="urn:nhibernate-mapping-2.2" assembly="NHibernateStudy" namespace="NHibernateStudy">
<class name="People" table="peoples">
<id name="Id" column="id" type="String">
<generator class="uuid.hex" />
</id>
<property name="Name" column="name" type="String" />
<property name="Sex" column="sex" type="Boolean" />
<property name="Age" column="age" type="Int32" />

<property name="FirstName" column="firstname" type="String" />
<property name="LastName" column="lastname" type="String" />
<property name="FullName" formula="firstname||lastname" type="String" />
<property name="TempFullName" formula="(select A.firstname||A.lastname fro m peoples as A where A.id=id)" type="String" />
</class>
</hibernate-mapping>

3、hibenate.cfg.xml中添加映射文件配置【添加到session-factory节点内】

1
<mapping resource="NHibernateStudy.People.hbm.xml" assembly="NHibernateStudy" />

4、可以操作People添加数据啦!

1
2
3
4
5
6
7
8
9
10
11
12
13
14
15
16
17
18
19
20
21
22
23
24
25
26
27
28
ISessionFactory sessionFactory = (new Configuration()).Configure().BuildSessionFactory();
ISession session = sessionFactory.OpenSession();

#region 添加一条数据
session.Delete("fro m People;");
session.BeginTransaction().Commit();

People p = new People();
p.Name = "addp" + DateTime.Now.ToString("MMddHHmmss");
p.Sex = false;
p.Age = 25;
p.FirstName = "first" + DateTime.Now.ToString("MMddH");
p.LastName = "last" + DateTime.Now.ToString("Hmmss");
session.Save(p);
session.BeginTransaction().Commit();
session.Evict(p);
#endregion

#region 显示数据库数据
//session.Clear();
IList<People> ps = session.CreateCriteria<People>().List<People>();
foreach (var item in ps)
{

Console.WriteLine("ID:" + item.Id + " Name:" + item.Name + " Sex:" + item.Sex + " Age:" + item.Age);
Console.WriteLine("FirstName:" + item.FirstName + " FullName:" + item.FullName + " TempFullName:" + item.TempFullName);
}
#endregion

上述代码中有两个额外的要点,下面理一下

第一个是自动生成id的策略,第二个是formula的使用

1、官方提供了许多常用的ID生成策略,基本足够用了,当然也可以自己实现。【注:个人常用的应该是uuid.hex了,主要是使用guid的字符串】

详见官方文档:查看;此处仅接受个人常用

- - - -
identity 数据库生成int型主键
uuid.hex System.Guid使用ToString()生成Guid
guid.comb Guid类型标识符

其中uuid映射为字符串类型,guid映射为Guid类型。

2、关于formula的使用,主要用于一个字段不是直接来自于数据库,是通过计算或多表筛选得出的。上文中就使用firstname和lastname拼接fullname【sqlite中字符串拼接用‘||’】。

其中需要注意的:新增数据,保存后立即查询,formula不生效,需要执行session.clear()清空缓存以使生效,或者使用session.Evict(x)将之前加的数据从缓存中移除,如此,formula才能正确执行。

NHibernate学习资料汇总

旧地址:http://blog.canself.com/nhibernate_docs/

相关学习网站:

1、官方网站——英文(地址更换过,后面许多网站或文档里的官网地址是老的,已经不能用了)

2、官方学习教程——英文

3、国内NHibernate讨论社区——博客园(活跃度已经降低了很多)

4、NHibernate之旅——李永京(写得比较早,现在某些地方不一样,不过仍然可以作为教程使用)

5、riccc的博客——博客园(可以作为参考,里面介绍了一些相关的东西,不过文章都有些老,有些东西需自己在理理)

6、源代码——GitHub(老代码在sourceforge上:去看看


下面是一些资料文档:
1、NHibernate2.0文档(中文版,虽然旧了点,但毕竟是中文的):下载地址1

2、NHibernate教程(李永京博客整理):下载地址1

3、NHibernate 3 Beginner’s Guide(英文):下载地址1

4、NHibernate 3.0 Cookbook(英文-推荐;虽然我英文不好,但也把他当参考书看了一点点,觉得这个书才是比较好的,唯独是英文的):下载地址1

Cookbook代码:下载地址1

咱就入个门之NHibernate数据库连接配置

旧地址:http://blog.canself.com/nhibernate_conn/

此文仅介绍NHibernate连接数据库配置;有关NHibernate的介绍此处不做详解,具体见NHibernate资料汇总页。

想用NHibernate,首先得连接数据库,下面就看看NHibernate的数据库连接。

关于不同数据库连接的简单配置,其实官方提供了许多【官方包中的Configuration Templates】-学习之初可以使用。

步骤【一般处理】:

1、添加hibernate.cfg.xml;

注:记得修改文件的属性“复制到输出目录”,改为始终复制或较新复制

2、添加文件内容,代码如下:【下为sqlite数据库配置】

1
2
3
4
5
6
7
8
9
10
<?xml version="1.0" encoding="utf-8" ?>
<hibernate-configuration xmlns="urn:nhibernate-configuration-2.2" >

<session-factory name="MySessionFactory">
<property name="connection.driver_class">NHibernate.Driver.SQLite20Driver</property>
<property name="connection.connection_string">Data Source=nhibernate.db;Password=12345678</property>
<property name="dialect">NHibernate.Dialect.SQLiteDialect</property>
</session-factory>

</hibernate-configuration>

3、添加cs代码

1
2
3
ISessionFactory sessionFactory = (new Configuration()).Configure().BuildSessionFactory();
sessionFactory.OpenSession();
sessionFactory.Close();

执行即可【注:sqlite中open不验证密码,此处可能无法验证其连接字符串正确性,可以换其他数据库尝试】

关于数据库的配置,不仅仅可以在hibernate.cfg.xml中配置数据库连接,亦可以在app.config中配置,代码如下:

1
2
3
4
5
6
7
8
9
10
11
12
13
14
15
16
17
18
19
20
<!--App.config-->
<?xml version="1.0" encoding="utf-8"?>
<configuration>

<configSections>
<section name="hibernate-configuration" type="NHibernate.Cfg.ConfigurationSectionHandler, NHibernate" />
</configSections>

<hibernate-configuration xmlns="urn:nhibernate-configuration-2.2">
<session-factory name="MySessionFactory">
<property name="connection.driver_class">NHibernate.Driver.SQLite20Driver</property>
<property name="connection.connection_string">Data Source=nhibernate.db;Password=12345678</property>
<property name="dialect">NHibernate.Dialect.SQLiteDialect</property>
</session-factory>
</hibernate-configuration>

<startup>
<supportedRuntime version="v4.0" sku=".NETFramework,Version=v4.0" />
</startup>
</configuration>

同样,可以使用hibernate.cfg.xml和app.config同时配置,相同的项会使用hibernate.cfg.xml配置会覆盖app.config的配置。

实际使用中,有时会出现需要连接多个数据库,可以通过手动指定配置文件来加载数据库连接,如下:【我们添加了一个second.cfg.xml文件,处理与hibernate.cfg.xml处理类似】

1
2
3
ISessionFactory secondsessionFactory= (new Configuration()).Configure(Path.Combine(AppDomain.CurrentDomain.BaseDirectory, "second.cfg.xml")).BuildSessionFactory();
secondsessionFactory.OpenSession();
secondsessionFactory.Close();

好了,简单连接配置这么多应该都用了。

下面看看hibernate.cfg.xml中的每一项的配置意义。【NHibernate.Cfg.Environment中列举了许多】

首先是上面用到的

connection.driver_class 连接驱动【某些数据库连接可省,有dialect即可】
connection.connection_string 数据库连接字符串
dialect sql方言【自己意会啥意思吧】

具体有哪些sql方言,直接上官网去看吧,挺多的。

下面是一些比较常用的配置:

1
2
3
4
5
6
7
8
9
10
11
12
13
14
15
16
17
18
19
20
<!--是否启用批量更新,默认0不启用-->
<property name="adonet.batch_size" >1</property>
<!--建表相关-->
<property name="hbm2ddl.auto">
update
<!--create:每次运行删除上一次的表-->
<!--create-drop:每次运行,sessionFactory打开建表,关闭删表-->
<!--update:常用,自动更新表结构-->
<!--validate:验证表结构,不删除创建表-->
</property>
<!--外连接抓取:单项关联(一对一,多对一);取值(0到3,0为关闭);NHibernate1.0中有use_outer_join,现弃用-->
<property name="max_fetch_depth">1</property>
<!--输出sql语句到控制台或日志——日志使用log4net配置-->
<property name="show_sql">true</property>
<!--查询语言中的替换;如下,true和false将在sql中翻译为整数常量-->
<property name="query.substitutions">true 1,false 0</property>
<!--启用查询缓存-->
<property name="cache.use_query_cache">true</property>
<!--启用二级缓存-->
<property name="cache.use_second_level_cache">true</property>

其中有一个没有加进去,proxyfactory.factory_class——因这个我网上查了许多,一开始就是不知道他是干哈的,最后才有所理解,其实际知识点是“动态代理”,基础不行,后面再好好看看这一块。
WPF的TabControl样式模板处理

旧地址:http://blog.canself.com/wpftabcontrol/

在WPF中,想要改变TabControl的样子要比在Winform中方便很多,但往往也有很多种方式处理。

首先,我们进行常规的处理方式,下面介绍两种:

第一种是直接修改TabItem的样式,但其中会有一个问题,其效果不完整,因为默认模板中含有一些触发器影响,此处需要将模板中的触发器删除以此实现效果:

1
2
3
4
5
6
7
8
9
10
11
12
13
14
15
16
17
18
19
20
21
22
23
24
25
26
27
28
29
<Style x:Key="TabItemStyle_Normal" TargetType="{x:Type TabItem}">
<Style.Triggers>
<Trigger Property="Selector.IsSelected" Value="True">
<Setter Property="Background" Value="Red"/>
</Trigger>
<Trigger Property="IsMouseOver" Value="True">
<Setter Property="Background" Value="Yellow"/>
</Trigger>
</Style.Triggers>
<Setter Property="Foreground" Value="Black"/>
<Setter Property="Padding" Value="6,1,6,1"/>
<Setter Property="BorderBrush" Value="#8C8E94"/>
<Setter Property="HorizontalContentAlignment" Value="Stretch"/>
<Setter Property="VerticalContentAlignment" Value="Stretch"/>
<Setter Property="Template">
<Setter.Value>
<ControlTemplate TargetType="{x:Type TabItem}">
<Grid SnapsToDevicePixels="true">
<Border x:Name="Bd" BorderBrush="{TemplateBinding BorderBrush}" BorderThickness="1,1,1,0" Background="{TemplateBinding Background}" Padding="{TemplateBinding Padding}">
<ContentPresenter x:Name="Content" ContentSource="Header" HorizontalAlignment="{Binding HorizontalContentAlignment, RelativeSource={RelativeSource AncestorType={x:Type ItemsControl}}}" RecognizesAccessKey="True" SnapsToDevicePixels="{TemplateBinding SnapsToDevicePixels}" VerticalAlignment="{Binding VerticalContentAlignment, RelativeSource={RelativeSource AncestorType={x:Type ItemsControl}}}"/>
</Border>
</Grid>
</ControlTemplate>
</Setter.Value>
</Setter>
<Setter Property="Height" Value="40"/>
<Setter Property="Width" Value="200"/>
<Setter Property="Background" Value="Blue"/>
</Style>

第二种是修改TabItem的模板,直接在其模板中添加触发器,此种处理方式在一般情况下更为合理

1
2
3
4
5
6
7
8
9
10
11
12
13
14
15
16
17
18
19
20
21
22
23
24
25
26
27
28
29
<Style x:Key="TabItemStyle_Normal2" TargetType="{x:Type TabItem}">
<Setter Property="Foreground" Value="Black"/>
<Setter Property="Padding" Value="6,1,6,1"/>
<Setter Property="BorderBrush" Value="#8C8E94"/>
<Setter Property="HorizontalContentAlignment" Value="Stretch"/>
<Setter Property="VerticalContentAlignment" Value="Stretch"/>
<Setter Property="Template">
<Setter.Value>
<ControlTemplate TargetType="{x:Type TabItem}">
<Grid SnapsToDevicePixels="true">
<Border x:Name="Bd" BorderBrush="{TemplateBinding BorderBrush}" BorderThickness="1,1,1,0" Padding="{TemplateBinding Padding}" Background="Gray">
<ContentPresenter x:Name="Content" ContentSource="Header" HorizontalAlignment="{Binding HorizontalContentAlignment, RelativeSource={RelativeSource AncestorType={x:Type ItemsControl}}}" RecognizesAccessKey="True" SnapsToDevicePixels="{TemplateBinding SnapsToDevicePixels}" VerticalAlignment="{Binding VerticalContentAlignment, RelativeSource={RelativeSource AncestorType={x:Type ItemsControl}}}"/>
</Border>
</Grid>
<ControlTemplate.Triggers>
<Trigger Property="IsMouseOver" Value="true">
<Setter Property="Background" TargetName="Bd" Value="LightYellow"/>
</Trigger>
<Trigger Property="IsSelected" Value="true">
<Setter Property="Panel.ZIndex" Value="1"/>
<Setter Property="Background" TargetName="Bd" Value="LightBlue"/>
</Trigger>
</ControlTemplate.Triggers>
</ControlTemplate>
</Setter.Value>
</Setter>
<Setter Property="Height" Value="50"/>
<Setter Property="Width" Value="200"/>
</Style>

使用:

1
2
3
4
5
6
7
8
9
10
11
12
13
14
<TabControl TabStripPlacement="Left" BorderThickness="1,1,5,1">
<TabItem Header="常规1" Style="{DynamicResource TabItemStyle_Normal}">
<Grid Background="#FFE5E5E5"/>
</TabItem>
<TabItem Header="常规2" Style="{DynamicResource TabItemStyle_Normal}">
<Grid Background="#FFE5E5E5"/>
</TabItem>
<TabItem Header="常规3" Style="{DynamicResource TabItemStyle_Normal2}" >
<Grid Background="#FFE5E5E5"/>
</TabItem>
<TabItem Header="常规4" Style="{DynamicResource TabItemStyle_Normal2}" >
<Grid Background="#FFE5E5E5"/>
</TabItem>
</TabControl>

然而,工作中总有一些情况用常规方式解决会比较繁琐,因此有以下特殊方法。

使用情况:每一个TabItem样式都不一样,如美工出图直接将文字保留在图上。常规方式就必须一个TabItem一个样式,使用特殊方法的话,可以只使用一个样式。

1
2
3
4
5
6
7
8
9
10
11
12
13
14
15
16
17
18
19
20
21
22
23
24
25
26
27
28
29
30
31
32
33
34
35
36
37
38
39
40
41
42
43
44
45
<Style x:Key="TabItemStyle_Special" TargetType="{x:Type TabItem}">
<Setter Property="Foreground" Value="Black"/>
<Setter Property="Padding" Value="6,1,6,1"/>
<Setter Property="BorderBrush" Value="#8C8E94"/>
<Setter Property="HorizontalContentAlignment" Value="Stretch"/>
<Setter Property="VerticalContentAlignment" Value="Stretch"/>
<Setter Property="Template">
<Setter.Value>
<ControlTemplate TargetType="{x:Type TabItem}">
<Grid SnapsToDevicePixels="true">
<Border x:Name="first" BorderBrush="{TemplateBinding BorderBrush}" BorderThickness="1,1,1,0" Background="{TemplateBinding Background}" Padding="{TemplateBinding Padding}" Visibility="Visible">
<TextBlock x:Name="Content1" HorizontalAlignment="{Binding HorizontalContentAlignment, RelativeSource={RelativeSource AncestorType={x:Type ItemsControl}}}" SnapsToDevicePixels="{TemplateBinding SnapsToDevicePixels}" VerticalAlignment="{Binding VerticalContentAlignment, RelativeSource={RelativeSource AncestorType={x:Type ItemsControl}}}" Text="{TemplateBinding Header}" Foreground="White"/>
</Border>
<Border x:Name="second" BorderBrush="{TemplateBinding BorderBrush}" BorderThickness="1,1,1,0" Background="{TemplateBinding Foreground}" Padding="{TemplateBinding Padding}" Visibility="Collapsed">
<TextBlock x:Name="Content2" HorizontalAlignment="{Binding HorizontalContentAlignment, RelativeSource={RelativeSource AncestorType={x:Type ItemsControl}}}" SnapsToDevicePixels="{TemplateBinding SnapsToDevicePixels}" VerticalAlignment="{Binding VerticalContentAlignment, RelativeSource={RelativeSource AncestorType={x:Type ItemsControl}}}" Text="{TemplateBinding Header}" Foreground="White"/>
</Border>
</Grid>
<ControlTemplate.Triggers>
<Trigger Property="IsMouseOver" Value="true">
<Setter Property="Background" TargetName="first">
<Setter.Value>
<LinearGradientBrush EndPoint="0,1" StartPoint="0,0">
<GradientStop Color="#EAF6FD" Offset="0.15"/>
<GradientStop Color="#D9F0FC" Offset=".5"/>
<GradientStop Color="#BEE6FD" Offset=".5"/>
<GradientStop Color="#A7D9F5" Offset="1"/>
</LinearGradientBrush>
</Setter.Value>
</Setter>
<Setter Property="Visibility" TargetName="first" Value="Collapsed"/>
<Setter Property="Visibility" TargetName="second" Value="Visible"/>
</Trigger>
<Trigger Property="IsSelected" Value="true">
<Setter Property="Panel.ZIndex" Value="1"/>
<Setter Property="Background" TargetName="first" Value="#F9F9F9"/>
<Setter Property="Visibility" TargetName="first" Value="Collapsed"/>
<Setter Property="Visibility" TargetName="second" Value="Visible"/>
</Trigger>
</ControlTemplate.Triggers>
</ControlTemplate>
</Setter.Value>
</Setter>
<Setter Property="Height" Value="50"/>
<Setter Property="Width" Value="200"/>
</Style>

使用:

1
2
3
4
5
6
7
8
<TabControl Grid.Column="1" TabStripPlacement="Right" BorderThickness="5,1,1,1">
<TabItem Header="特殊1" Style="{DynamicResource TabItemStyle_Special}" Background="Blue" Foreground="Green">
<Grid Background="#FFE5E5E5"/>
</TabItem>
<TabItem Header="特殊2" Style="{DynamicResource TabItemStyle_Special}" Background="Yellow" Foreground="Red">
<Grid Background="#FFE5E5E5"/>
</TabItem>
</TabControl>

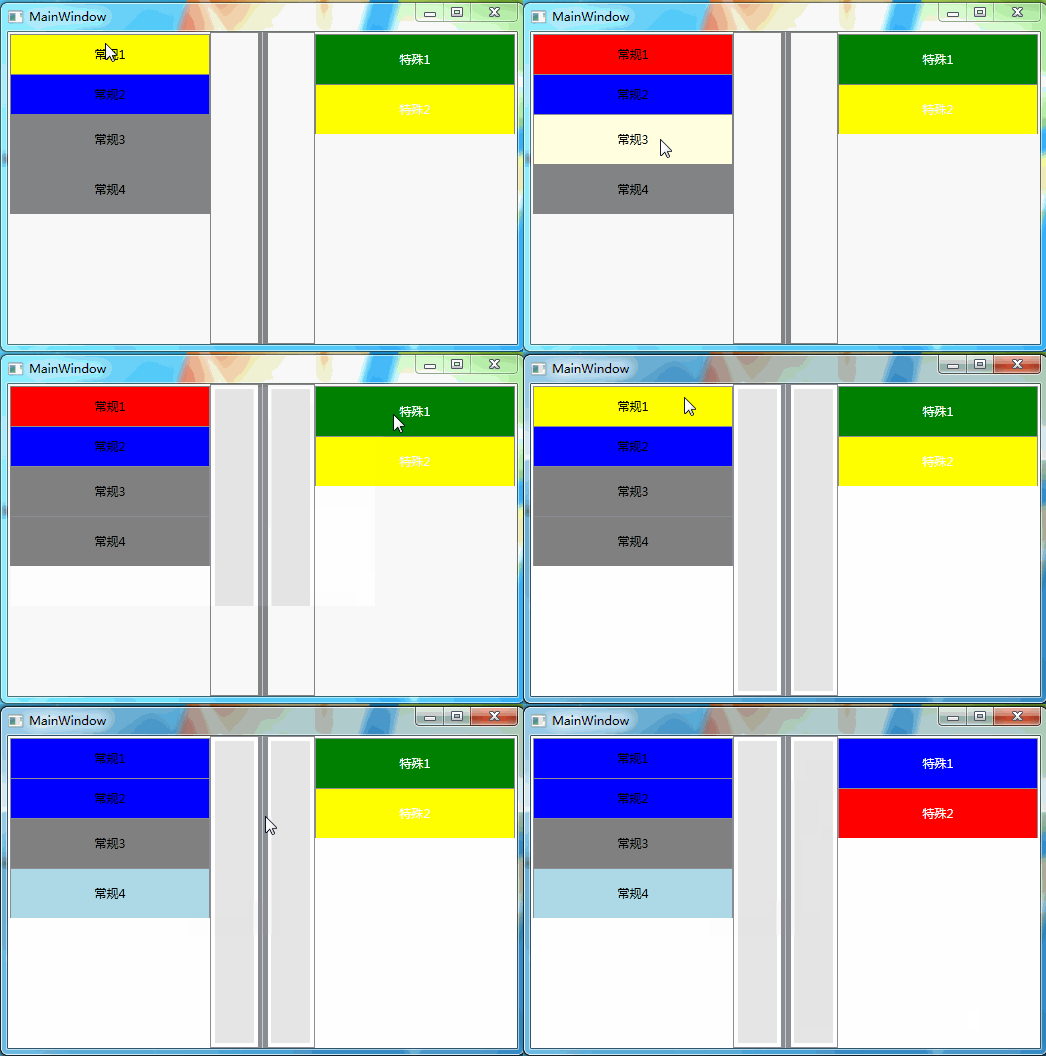
下图是测试结果图:其中常规1、2使用样式修改;常规3、4使用模板修改;特殊1、2为特殊方式处理。其中包含两个效果【MouseOver和Selected】