修改Nuget的缓存目录

添加缓存配置目录

  • 添加Nuget.config文件到C:\Program Files (x86)\NuGet\Config目录下
  • 将下方代码添加到Nuget.config文件中
1
2
3
4
5
6
<?xml version="1.0" encoding="utf-8"?>
<configuration>
<config>
<add key="globalPackagesFolder" value="D:\Caches\Nuget\.nuget\packages\" />
</config>
</configuration>

Nuget原始缓存目录:C:\Users\***\.nuget\packages\

查看本地Nuget缓存目录信息

  • 查看nuget配置目录: dotnet nuget locals all -l

Inno Setup 安装包Visual C++环境检测

Inno Setup 安装包Visual C++环境检测

返回目录索引
示例代码-VisualCPPSetup.iss

将Visual C++安装包添加到安装包中

下列代码将VC_redist的x86安装包添加到安装包中,若需要其他安装包,请至 https://support.microsoft.com/zh-cn/help/2977003/the-latest-supported-visual-c-downloads 下载。

2015-2019版本见:https://visualstudio.microsoft.com/zh-hans/downloads/ 中的其他工具和框架

1
2
3
4
5

[Files]
Source: "HelloWorld.exe"; DestDir: "{app}";Components:main
Source:".\VC_redist.x86.exe";DestDir:"{tmp}";DestName:"vcredistx86.exe";Flags:ignoreversion

[Code]段添加Visual C++环境检查代码

  • 添加Visual C++环境检查代码
    • 关于versionBuild值的来源,见下载的VC_redist.x86.exe文件的属性-详细信息-产品版本的第三级版本号
1
2
3
4
5
6
7
8
9
10
11
12
13
14
15
16
17
18
19
20
21
22
23
24
25
26
27
28
29
30
31
32
33
34
35
36
37
38
39

//vc++ 安装环境检查 plat:x64 x86
function IsVCPPDetected(version:string;plat:string): Boolean;
var
success: Boolean;
key,versionkey:string;
build,versionBuild:cardinal;
begin
versionkey:=version;
versionBuild:=0;

case version of
'13':
begin
versionkey:='12.0';
versionBuild:=40660;
end;

'15':
begin
versionkey:='14.0';
versionBuild:=23026;
end;
'19':
begin
versionkey:='14.0';
versionBuild:=28720;
end;

end;

key:='SOFTWARE\Wow6432Node\Microsoft\VisualStudio\'+versionkey+'\VC\Runtimes\'+plat;

success:=RegQueryDWordValue(HKLM, key, 'Bld', build);
success:=success and (build>=versionBuild);

result := success;
end;

  • 在初始化安装包时,检查C++环境
    • 下面示例中,检查Visual C++ 2019的32位x86版本是否安装【2015-2019现在是共享相同的可再发行软件文件】
1
2
3
4
5
6
7
8
9
10
11
12
13
14
15
16
17
18
19
20
21
22
23
24
25
26
27
28
29
30
31
32
33
34
         
//安装包初始化
function InitializeSetup(): Boolean;
var Path:string ;
ResultCode: Integer;
Success:Boolean;
begin
Success:=true;

if not IsVCPPDetected('19','x86') then
begin
MsgBox('软件运行需要 Microsoft Visual C++ 2019 Redistributable x86, 即将开始安装vc redist x86。', mbInformation, MB_OK);

ExtractTemporaryFile('vcredistx86.exe');
Path:=ExpandConstant('{tmp}\vcredistx86.exe')
Exec(Path, '', '', SW_SHOWNORMAL, ewWaitUntilTerminated, ResultCode);

if not IsVCPPDetected('19','x86') then
begin
if MsgBox('Microsoft Visual C++ 2019 Redistributable x86组件安装失败,部分功能无法使用,是否继续安装!',mbInformation,MB_YesNo) = IDYES then
begin
Success:=true;
end else begin
Success := false;
result:=Success;
Exit;
end;
end
else begin end;
end;

result := Success;
end;


解:奇葩史

Inno Setup 安装包.Net Framework环境检测

Inno Setup 安装包.Net Framework环境检测

返回目录索引
示例代码-DotNetFrameworkSetup.iss

在开发dotNet应用时,常常需要保证用户环境已经安装.NET Framework,下面将介绍如何在Inno Setup脚本中添加.NET Framework检查并安装。

将Framework安装包添加到安装包中

下列代码将.net framework 4.7.2的Web安装包添加到安装包中,若需要离线安装包,请至 https://dotnet.microsoft.com/ 下载离线包。

1
2
3
4
5

[Files]
Source: "HelloWorld.exe"; DestDir: "{app}";Components:main
Source:".\NDP472-KB4054531-Web.exe";DestDir:"{tmp}";DestName:"dotnet472.exe";Flags:ignoreversion

[Code]段添加.Net framework环境检查代码

1
2
3
4
5
6
7
8
9
10
11
12
13
14
15
16
17
18
19
20
21
22
23
24
25
26
27
28
29
30
31
32
33
34
35
36
37
38
39
40
41
42
43
44
45
46
47
48
49
50
51
52
53
54
55
56
57
58
59
60
61
62
63
64
65
66
67
68
69
70
71
72
73
74
75
76
77
78
79
80
81
82
83

//.net framework安装检查 —— 判断指定的.NET Framework版本及service pack是否已经安装
// 函数参数说明:
// 参数1:version -- 指定待判断的.NET Framework版本【下面列举了对应关系】:
// 'v1.1' .NET Framework 1.1
// 'v2.0' .NET Framework 2.0
// 'v3.0' .NET Framework 3.0
// 'v3.5' .NET Framework 3.5
// 'v4\Client' .NET Framework 4.0 Client Profile
// 'v4\Full' .NET Framework 4.0 Full Installation
// 'v4.5' .NET Framework 4.5
// 'v4.5.1' .NET Framework 4.5.1
// 'v4.5.2' .NET Framework 4.5.2
// 'v4.6' .NET Framework 4.6
// 'v4.6.1' .NET Framework 4.6.1
// 'v4.6.2' .NET Framework 4.6.2
// 'v4.7' .NET Framework 4.7
// 'v4.7.1' .NET Framework 4.7.1
// 'v4.7.2' .NET Framework 4.7.2
// `v4.8` .NET Framework 4.8
//
// 参数2:service -- 指定待判断的service pack版本:
// 0 No service packs required
// 1, 2, etc. Service pack 1, 2, etc. required
function IsDotNetDetected(version: string; service: cardinal): boolean;
var
key, versionKey: string;
install, release, serviceCount, versionRelease: cardinal;
success: boolean;
begin
versionKey := version;
versionRelease := 0;

// .NET 1.1 and 2.0 embed release number in version key
if version = 'v1.1' then begin
versionKey := 'v1.1.4322';
end else if version = 'v2.0' then begin
versionKey := 'v2.0.50727';
end

// .NET 4.5 and newer install as update to .NET 4.0 Full
else if Pos('v4.', version) = 1 then begin
versionKey := 'v4\Full';
case version of
'v4.5': versionRelease := 378389;
'v4.5.1': versionRelease := 378675; // 378758 on Windows 8 and older
'v4.5.2': versionRelease := 379893;
'v4.6': versionRelease := 393295; // 393297 on Windows 8.1 and older
'v4.6.1': versionRelease := 394254; // 394271 before Win10 November Update
'v4.6.2': versionRelease := 394802; // 394806 before Win10 Anniversary Update
'v4.7': versionRelease := 460798; // 460805 before Win10 Creators Update
'v4.7.1': versionRelease := 461308; // 461310 before Win10 Fall Creators Update
'v4.7.2': versionRelease := 461808; // 461814 before Win10 April 2018 Update
'v4.8': versionRelease := 528040;
end;
end;

// installation key group for all .NET versions
key := 'SOFTWARE\Microsoft\NET Framework Setup\NDP\' + versionKey;

// .NET 3.0 uses value InstallSuccess in subkey Setup
if Pos('v3.0', version) = 1 then begin
success := RegQueryDWordValue(HKLM, key + '\Setup', 'InstallSuccess', install);
end else begin
success := RegQueryDWordValue(HKLM, key, 'Install', install);
end;

// .NET 4.0 and newer use value Servicing instead of SP
if Pos('v4', version) = 1 then begin
success := success and RegQueryDWordValue(HKLM, key, 'Servicing', serviceCount);
end else begin
success := success and RegQueryDWordValue(HKLM, key, 'SP', serviceCount);
end;

// .NET 4.5 and newer use additional value Release
if versionRelease > 0 then begin
success := success and RegQueryDWordValue(HKLM, key, 'Release', release);
success := success and (release >= versionRelease);
end;

result := success and (install = 1) and (serviceCount >= service);
end;

  • 在初始化安装包时,检查.Net环境
    • 下面示例中,检查.Net Framework 4.7.2是否安装
1
2
3
4
5
6
7
8
9
10
11
12
13
14
15
16
17
18
19
20
21
22
23
24
25
26
27
28
29
30
31
32
33
34
35
36
37
38

//安装包初始化
function InitializeSetup(): Boolean;
var Path:string ;
ResultCode: Integer;
Success:Boolean;
begin
Success:=true;

if not IsDotNetDetected('v4.7.2', 0) then
begin
MsgBox('软件运行需要 Microsoft .NET Framework 4.7.2, 即将开始安装.NET Framework。', mbInformation, MB_OK);

ExtractTemporaryFile('dotnet472.exe');
Path:=ExpandConstant('{tmp}\dotnet472.exe')
Exec(Path, '', '', SW_SHOWNORMAL, ewWaitUntilTerminated, ResultCode);

if not IsDotNetDetected('v4.7.2', 0) then
begin
if MsgBox('.Net Framework4.7.2组件安装失败,无法运行程序,是否继续安装!',mbInformation,MB_YESNO) = IDYES then
begin
Success:=true
end else
begin
Success := false;
result:=Success;
Exit;
end;
end
else
Success := true;
end
else
Success := true;

result := Success;
end;


解:奇葩史

Inno Setup 安装包升级处理

Inno Setup 安装包升级处理

返回目录索引
示例代码-UpdateSetup.iss

添加[Code]

Inno Setup 要实现安装包升级检测,需要编写检测代码,其语法是Pascal【看的懂伪代码及C语言的,看起来不会太难】。

首先添加Code段基础代码,inno setup中代码首先会执行InitializeSetup(),所以我们会在此方法的基础上做升级检测。

1
2
3
4
5
6
7

[Code]
function InitializeSetup(): Boolean;
begin
result := true;
end;

定义软件的id和version

安装包通过AppId和AppVersion来找到对应的应用信息。

1
2
3
4
5
6
7
8
9

#define appid "{F3234165-547C-4DE1-AF86-767178AF3FAC}"
#define appversion "1.0.0.2"

[Setup]
AppName=HelloWorld
AppId={{#appid}
AppVersion={#appversion}

添加版本检测代码

注意检测代码添加至InitializeSetup函数之前

  • 从注册表中获取已安装的版本
  • 比较版本号,弹出升级提示
1
2
3
4
5
6
7
8
9
10
11
12
13
14
15
16
17
18
19
20
21
22
23
24
25
26
27
28
29
30
31
32
33
34
35
36
37
38
39
40
41
42
43
44
45
46
47
48
49
50
51
52
53
54
55
56
57
58
59
60
61
62
63
64
65
66
67
68
69
70
71
72
73
74
75
76
77
78
79
80
81
82
83
84
85
86
87
88
89
90
91
92
93

//旧版本检测,安装新版本
function GetNumber(var temp: String): Integer;
var
part: String;
pos1: Integer;
begin
if Length(temp) = 0 then
begin
Result := -1;
Exit;
end;
pos1 := Pos('.', temp);
if (pos1 = 0) then
begin
Result := StrToInt(temp);
temp := '';
end
else
begin
part := Copy(temp, 1, pos1 - 1);
temp := Copy(temp, pos1 + 1, Length(temp));
Result := StrToInt(part);
end;
end;

function CompareInner(var temp1, temp2: String): Integer;
var
num1, num2: Integer;
begin
num1 := GetNumber(temp1);
num2 := GetNumber(temp2);
if (num1 = -1) or (num2 = -1) then
begin
Result := 0;
Exit;
end;
if (num1 > num2) then
begin
Result := 1;
end
else if (num1 < num2) then
begin
Result := -1;
end
else
begin
Result := CompareInner(temp1, temp2);
end;
end;

function CompareVersion(str1, str2: String): Integer;
var
temp1, temp2: String;
begin
temp1 := str1;
temp2 := str2;
Result := CompareInner(temp1, temp2);
end;

function UpdateSetup(): Boolean;
var
oldVersion: String;
uninstaller: String;
ErrorCode: Integer;
begin

if RegKeyExists(HKEY_LOCAL_MACHINE,'SOFTWARE\Microsoft\Windows\CurrentVersion\Uninstall\{#appid}_is1') then
begin
RegQueryStringValue(HKEY_LOCAL_MACHINE,'SOFTWARE\Microsoft\Windows\CurrentVersion\Uninstall\{#appid}_is1','DisplayVersion', oldVersion);
if (CompareVersion(oldVersion, '{#appversion}') <= 0) then
begin
if MsgBox('已安装版本:' + oldVersion + ' 的应用. 是否覆盖安装新版本?',mbConfirmation, MB_YESNO) = IDYES then
begin
Result := True;
end
else
begin
Result := False;
end;
end
else
begin
MsgBox('已安装较新版本( ' + oldVersion + ' )的应用。安装程序即将退出',mbInformation, MB_OK);
Result := False;
end;
end
else
begin
Result := True;
end;
end;

将升级检测流程添加到安装流程中

1
2
3
4
5
6
7
8
9
10
11
12
13
14
15
16
17

function InitializeSetup(): Boolean;
var
Success:Boolean;
begin
Success:=true;

//升级检测
if not UpdateSetup() then
begin
Success:=false;
end
else begin end;

result := Success;
end;

扩展操作 —— 应用是否打开检测

安装过程中检测旧版本应用是否开启,若开启,则自动关闭,然后继续安装流程。

1
2
3
4
5
6
7
8
9
10
11
12
13
14
15
16
17
18
19
20
21
22
23
24
25
26
27
28
29
30
31
32
33
34
35
36
37
38
39
40
41
42
43
44
45
46
47
48
49
50
51
52
53
54
55
56
57
58
59
60

//-----------------------------------------
//关闭应用
procedure CloseApp(AppName: String);
var
WbemLocator : Variant;
WMIService : Variant;
WbemObjectSet: Variant;
WbemObject : Variant;
begin;
WbemLocator := CreateOleObject('WbemScripting.SWbemLocator');
WMIService := WbemLocator.ConnectServer('localhost', 'root\CIMV2');
WbemObjectSet := WMIService.ExecQuery('SELECT * FROM Win32_Process Where Name="' + AppName + '"');
if not VarIsNull(WbemObjectSet) and (WbemObjectSet.Count > 0) then
begin
WbemObject := WbemObjectSet.ItemIndex(0);
if not VarIsNull(WbemObject) then
begin
WbemObject.Terminate();
WbemObject := Unassigned;
end;
end;
end;
//--------------------------------------

//安装包初始化
function InitializeSetup(): Boolean;
var
Success:Boolean;
IsRunning: Integer;
begin
Success:=true;

IsRunning:=FindWindowByWindowName('HelloWorld');
if IsRunning<>0 then
begin
if Msgbox('安装程序检测到客户端正在运行。' #13#13 '您必须先关闭它然后单击“是”继续安装,或按“否”退出!', mbConfirmation, MB_YESNO) = idNO then
begin
Success:=false;
end
else
begin
CloseApp('HelloWorld.exe');
end;
end
else begin end;

if Success then
begin
//升级检测
if not UpdateSetup() then
begin
Success:=false;
end
else begin end;
end;

result := Success;
end;


掘:奇葩史

Inno Setup 安装包中文支持

返回目录索引
示例代码-ChineseSetup.iss

下载中文资源文件ChineseSimplified.isl

中文资源-ChineseSimplified.isl

Inno Setup中文支持并非官方翻译,所以在官方安装包中并未包含中文资源。

拷贝ChineseSimplified.isl文件至Languages目录

ChineseSimplified.isl文件拷贝至Inno Setup软件安装目录下的Languages目录内。

编写Inno Setup脚本

添加如下代码至.isl脚本中:

1
2
3
4

[Languages]
Name:"cn";MessagesFile:"compiler:Languages\ChineseSimplified.isl"

完成后编译即可,此时软件安装界面上显示的就是中文了。


  • 完整示例代码如下:
1
2
3
4
5
6
7
8
9
10
11
12
13
14
15
16
17
18
19
20
21

;中文安装包示例

[Setup]
AppName=HelloWorld
AppVersion=1.0.0.0
WizardStyle=modern
DefaultDirName={autopf}\HelloWorld
DefaultGroupName=HelloWorld
UninstallDisplayIcon={app}\HelloWorld.exe
Compression=lzma2
SolidCompression=yes
OutputDir=userdocs:Inno Setup Examples Output
OutputBaseFilename=ChineseSetup

[Files]
Source: "HelloWorld.exe"; DestDir: "{app}"

[Languages]
Name:"cn";MessagesFile:"compiler:Languages\ChineseSimplified.isl"


掘:奇葩史

Inno Setup指南 —— 教程索引

InnoSetup指南 —— 教程索引

鉴于VSCode都用inno setup打包了,个人就学习一下用inno做安装包的简易操作

用Inno做一个最简单的安装包

1
2
3
4
5
6
7
8
9
10
11
12
13
14
15
16

[Setup]
AppName=HelloWorld
AppVersion=1.0.0.0
WizardStyle=modern
DefaultDirName={autopf}\HelloWorld
DefaultGroupName=HelloWorld
UninstallDisplayIcon={app}\HelloWorld.exe
Compression=lzma2
SolidCompression=yes
OutputDir=userdocs:Inno Setup Examples Output
OutputBaseFilename=HelloWorldSetup

[Files]
Source: "HelloWorld.exe"; DestDir: "{app}"

  • Inno Setup Compiler打开.iss文件,若安装时,关联了.iss文件,可以直接双击打开
  • 点击编译 Compile 按钮,HelloWorldSetup.exe安装包将生成到用户文档目录下的Inno Setup Examples Output目录中

其他常用标记说明

1
2
3
4
5
6

[Icons]
Name: "{group}\HelloWorld"; Filename: "{app}\HelloWorld.exe"
Name: "{commondesktop}\HelloWorld"; Filename: "{app}\HelloWorld.exe"
Name: "{group}\卸载HelloWorld"; Filename: "{uninstallexe}"

1
2
3
4
5
6
7
8
9
10
11
12

[Files]
Source: "HelloWorld.exe"; DestDir: "{app}";Components:main

[Types]
Name: "full"; Description: "完全安装"
Name: "compact"; Description: "最小安装"
Name:"custom";Description:"自定义安装"; Flags:iscustom

[Components]
Name:main;Description:"主程序";Types:full

命令行执行打包

cmd命令行:

1
2
3

"C:\Program Files (x86)\Inno Setup 6\ISCC.exe" SimplestSetup.iss

powershell脚本[SimplestSetup.ps1]

1
2
3
4

$isccexe='C:\Program Files (x86)\Inno Setup 6\ISCC.exe'
&$isccexe $PSScriptRoot'\SimplestSetup.iss'

更多

Inno Setup官方内容

个人试验整理


掘:奇葩史

Wix Toolset 本地化MSI中文安装包制作

Wix Toolset 本地化MSI中文安装包制作

本文针对Wix制作**中文安装包(.msi)**中的一些内容进行整理 —— 其他语言类似
本文采用Visual Studio构建安装包 —— 推荐,因为足够方便。
示例源码

设置项目Cultures属性

  • zh-CN添加到项目的Cultures属性中【可以添加多种语言支持,以分号 ; 分隔】。
    • 方式一:右键项目属性修改:
    • 方式二:直接修改.wixproj项目文件内容,添加如下代码:
1
2
3
4
5

<PropertyGroup>
<Cultures>zh-CN;</Cultures>
</PropertyGroup>

添加WixUIExtension.dll引用

Wix安装包中基本流程的本地化资源已经打包至WixUIExtension.dll,引用此文件,即可在安装流程中显示中文流程。

见官方代码:https://github.com/wixtoolset/wix3/blob/master/src/ext/UIExtension/wixlib/WixUI_zh-CN.wxl

修改ProductLanguage属性

此值设置与否,并不影响中文安装包打包,不过既然做中文包,就做的彻底一些。

ProductLanguage的默认值为1033,其为en-usLCID,将其值改为2052,即zh-cn

1
2
3
4
5
6
7
8
9

<Product Id="*"
Name="Jess.Sample.Setup.ChineseLocalization"
Language="2052"
Version="1.0.0.0"
Manufacturer="Test中文"
UpgradeCode="0045cd81-6128-4e08-b8c2-357327c5c9ba">
</Product>

设置PackageSummaryCodepage属性

MSI属性 详细信息显示中文

PackageSummaryCodepage属性设置为936

1
2
3
4
5
6

<Package InstallerVersion="200"
Compressed="yes"
SummaryCodepage="936"
InstallScope="perMachine" />

设置此属性的作用,是让MSI安装包的属性-详细信息显示中文。

如下图,若不配置SummaryCodepage作者信息显示不了中文:

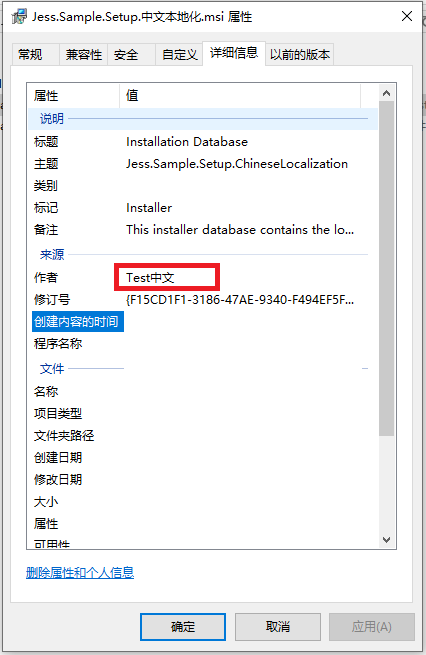
当未配置SummaryCodepage时,作者信息显示 Test,而非 Test中文


奇葩史

WPF中登录窗口的跳转处理

WPF中登录窗口的跳转处理

在WPF应用设计中,常常需要在主窗口之前设置一个前置登录窗口,为此整理了一下可行的方案。
示例源码:Jess.Sample.LoginWindow

方案一:添加Program.cs,模仿Winform初始代码

不做整理,个人不推荐,既然用了WPF,就尽量不把Winform的东西引入进来。

方案二:在主窗体MainWindow的构造函数中处理登录操作

此方案相对局限,若单纯只有个登录操作,可以使用此法 —— 可依据需要调整InitializeComponent();的先后顺序。

1
2
3
4
5
6
7
8
9
10
11
12
13
14
15
16

public partial class MainWindow : Window
{
public MainWindow()
{
WindowLogin win = new WindowLogin();
if (!(win.ShowDialog() ?? false))
{
App.Current.Shutdown();
return;
}

InitializeComponent();
}
}

方案三:重写ApplicationOnStartup方法

注意事项:

  • OnStartup中关闭窗体,会导致进入不了主窗体,因此需要手动控制ShutdownMode【默认值:ShutdownMode.OnLastWindowClose
  • 不得在App构造函数中,进行UI显示操作,因为这会导致一些锁的释放,引发OnStartup提前触发【OnStartup是在Application的构造函数中异步调用的】

官方Window.cs源码的窗体关闭流程中有一段以下代码:

1
2
3
4
5
6
7

if (((App.Windows.Count == 0) && (App.ShutdownMode == ShutdownMode.OnLastWindowClose))
|| ((App.MainWindow == this) && (App.ShutdownMode == ShutdownMode.OnMainWindowClose)))
{
App.CriticalShutdown(0);
}

由此可见,默认情况下,在OnStartup中调用关闭窗体,会直接导致Shutdown的调用。


鉴于此,主要有以下修改方式【只要避免内部调用Shutdown即可】:

保证登录窗体关闭时,不会满足Shutdown调用条件

  • 全局自己手动控制Shutdown:使用ShutdownMode.OnExplicitShutdown,在需要退出应用时,调用App.Current.Shutdown();
  • 在登录窗体前后,切换ShutdownMode:登录前改为ShutdownMode.OnExplicitShutdown,窗体关闭后,恢复为ShutdownMode.OnLastWindowClose
  • 控制只有主窗体关闭时,才退出程序:指定MainWindow,手动启动MainWindow,不在依赖StartupUri

全局手动控制Shutdown

  • 设置ShutdownMode为OnExplicitShutdown;
  • 在需要退出应用的窗体中,重写OnClosed方法,手动调用App.Current.Shutdown()
1
2
3
4
5
6
7
8
9
10
11
12
13
14
15
16
17
18
19
20
21

public partial class App : Application
{
public App()
{
this.ShutdownMode = ShutdownMode.OnExplicitShutdown;
}

protected override void OnStartup(StartupEventArgs e)
{
WindowLogin win = new WindowLogin();
if (!(win.ShowDialog() ?? false))
{
App.Current.Shutdown();
return;
}

base.OnStartup(e);
}
}


1
2
3
4
5
6
7
8
9
10
11
12
13
14
15

public partial class MainWindow : Window
{
public MainWindow()
{
InitializeComponent();
}

protected override void OnClosed(EventArgs e)
{
base.OnClosed(e);
App.Current.Shutdown();
}
}

窗体显示前后切换ShutdownMode

  • 直接在登录窗体前后设置ShutdownMode即可:
1
2
3
4
5
6
7
8
9
10
11
12
13
14
15
16
17
18

public partial class App : Application
{
protected override void OnStartup(StartupEventArgs e)
{
this.ShutdownMode = ShutdownMode.OnExplicitShutdown;
WindowLogin win = new WindowLogin();
if (!(win.ShowDialog() ?? false))
{
this.Shutdown();
return;
}
this.ShutdownMode = ShutdownMode.OnLastWindowClose;

base.OnStartup(e);
}
}

指定App主窗体MainWindow

  • 删除App.xaml文件中是StartupUri属性设置。
  • 设置主窗体与程序关闭模式。
1
2
3
4
5
6
7
8
9
10
11
12
13
14
15
16
17
18
19
20
21
22
23
24

public partial class App : Application
{
public App()
{
this.MainWindow = new MainWindow();
this.ShutdownMode = ShutdownMode.OnMainWindowClose;
}

protected override void OnStartup(StartupEventArgs e)
{
WindowLogin win = new WindowLogin();
if (!(win.ShowDialog() ?? false))
{
this.Shutdown();
return;
}

base.OnStartup(e);

this.MainWindow.Show();
}
}

补充说明

在上面前两种的OnStartup的处理中,有个隐藏的问题,他们仍然会去创建MainWindow。如果想避免初始化MainWindow,有以下两种方式:

  • 在调用Shutdown之后调用Environment.Exit(0);,强制退出。
  • 重写ApplicationOnNavigating方法,设置事件参数的Cancel属性。
1
2
3
4
5
6
7

protected override void OnNavigating(NavigatingCancelEventArgs e)
{
e.Cancel = true;
base.OnNavigating(e);
}


掘:奇葩史